New User Training
All Users
- 5 minutes
- Web page content
- 5 minutes
- Info Sheet | Video
Secure web portal access for sites without Single Sign-On (SSO).
- 10 minutes
- Info Sheet | PDF Guide | Video
- 15 minutes
- PDF Guide | Video
- 10 minutes
- PDF Guide | Video
- 5-10 minutes
- Info Sheet
Special Topics
- 10 minutes
- Info Sheet | PDF Guide
- HIE Admins
- 15 minutes
- PDF Guide | Video
- Care Coord. & Managers
- 15 minutes
- Info Sheet | PDF Guide
- Panel Uploader
- 20 minutes
- Info Sheet
- Medicaid Redet. Sites
- TBD - Coming Soon
- SUD/MAT Providers
Patient Panel Upload Tips
- 20 minutes
- PDF Guide | Information Sheet | Video | Templates
- Panel Uploader
What is the Panel Processor?
A patient panel is necessary for facilities accessing the HIE through the browser-based portal to view their patients’ records and use care management and notification tools, such as Population Explorer, which provides alerts regarding patient encounters.
The panel establishes your treatment relationship to the patient and provides a legitimate reason to view a patient’s chart. Providing a patient panel is required for HIE access.
The Panel Processor is the tool used to upload a list of patients (your “panel”) so you can:
- Receive alerts when your patients have encounters
- Monitor activity across your patient population
- Support care coordination workflows
Panel Management Responsibilities
Each organization is responsible for maintaining its patient panel in the HIE Portal. This is handled by a designated individual or team.
- Panels must be updated at least annually.
- We recommend updating more frequently, especially if your patient panel / case load changes often.
- Keeping your panel up to date ensures accurate alerts and access to your patients’ records.
Accessing your Patient Records
If a patient is not on your panel, you may still be able to access their record by attesting and “breaking the glass.”
- This is intended for permitted, exceptional use cases only
- It should not replace uploading and maintaining a patient panel
- All “break the glass” access is logged and auditable
Frequently Asked Questions
What file format should I use?
CSV (comma delimited). Excel (.xlsx) and Numbers (.numbers) files will not upload correctly.
Why was my panel rejected?
Most commonly due to formatting issues, missing required fields, modified column headers, or failure to follow the naming convention.
How often should I upload a panel?
As often as needed, especially if your patient population changes frequently.
What if I don’t have complete patient information?
Only required fields must be completed. Optional fields can be left blank. However, do not delete column
headers, just leave the column blank.
Preparing your Panel for Upload
Before uploading your panel, ensure your file is complete, correctly formatted, and ready for processing.
FIle Setup
Template:
Use the correct patient panel template. Field requirements and definitions are provided on the back.
Headers:
Do not rename, move, or delete column headers. Copy your data into the template to avoid accidental changes.
File Type:
Save your file as a .csv (comma delimited) file (not .xlsx). File must be converted from Excel (not from the Numbers application).
File Name:
Follow the required file naming format: subscribercode-1-z-MM-DD-YYYY. (Ex: ENS_VAL-1-z-02-14-2023).
Formatting:
Remove colors, formatting, and instructional text before uploading
Data Quality
Required Fields:
All required fields (blue highlighted fields) must be complete and properly formatted. See field reference on the back for full details.
Patient Identifier:
Use your organization’s Medical Record Number (MRN) when available. If an MRN is not available, you may use the patient’s Medicaid ID.
Accuracy:
Ensure data is current and accurate.
Blank Spaces:
Avoid extra spaces within cells.
Special Characters:
Do not include special characters in required fields (e.g.: *, /, (), etc.)
Additional Content:
Do not add additional notes or descriptions in address 1 or address 2 fields (e.g.: lives with wife, lives in shelter)
Duplicate Entries:
Ensure there are no duplicate patients before uploading.
Important Notes
- Panels are valid for one year, but you can update more frequently.
- By default, any NEW panel upload will overwrite your previous panel file.
- Most upload issues are caused by formatting errors, incorrect file types, or failure to follow the naming convention.
Troubleshooting: Panel Processor Not Loading
If the Panel Processor does not load properly or appears blank, the issue is typically related to your browser’s cookie or privacy settings:
- Check your browser cookie settings
- Allow third-party cookies
- Add the HIE Portal as an allowed site or exception
Template Field Details
The following section provides an overview of the patient panel template fields, including which fields are required and important formatting notes for each. Use this reference to ensure your panel file is completed correctly before upload. Fields Q and beyond are not shown in the screenshots and are all considered optional.
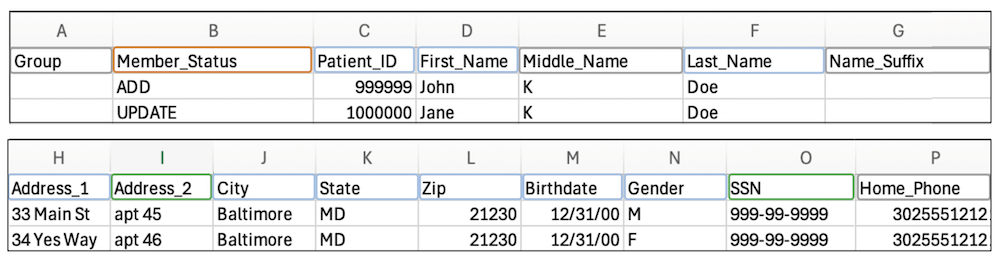
Values Always Required
Patient_ID: Patient IDs cannot contain spaces or additional characters such as (‘ single quote, “ double quote, / slash, \ backslash, % percent, < less than sign, > greater than sign, + plus sign,? question mark, ‘apostrophe, ` back-quote.) Add numbers and/or letters as: 12345, 12345ABC.
First_Name: It is best to use a space between multiple first names, but do not replace apostrophes or other characters in the name with spaces to maintain the best chances at a phonetic match. If the patient uses a single letter as a name, spell it out (ex. “J” = “Jay”). Otherwise, the name will be considered anonymous.
Last_Name: It is best to use a space between multiple last names. If the name is hyphenated, please include the hyphen.
Address_1: For individuals with no fixed address, it’s okay to use the following terms: “No fixed address” or “Homeless” in this field.
City: Ensure the spelling of the city’s name is consistent and spelled correctly.
State: Use the abbreviated two letters (MD, DC, VA, etc.).
Zip: A 5-digit zip code is sufficient.
Birthdate: The birthdate can be entered in M/D/YYYY or MM/DD/YYYY format.
Gender: Male, Female, Unknown, Other or M/F/U/O
Values Optional
Group: Group or population within your organization that the patient is assigned to (if any)
Middle_Name: It is best to use a space between multiple middle names.
Name_Suffix: The following values are acceptable: Sr., Jr., III
Home_Phone: Acceptable formats: 9999999999 or 999-999-9999
Work_Phone: Acceptable formats: 9999999999 or 999-999-9999
Cell_Phone: Acceptable formats: 9999999999 or 999-999-9999
Practice: The name of the practice associated with this patient panel.
Location: Practice location. Ex: 123 Main St Washington DC 20672
PCP: Patient’s Primary Care Provider
NPI: PCP’s 10-digit National Provider Identifier. Acceptable format: 1111111111
TaxID: Organization’s associated 9-digit Taxpayer Identification Number.
Insurance: Patient’s insurance provider. Ex: CareFirst BCBS
ACO: Patient’s Accountable Care Organization
Account_Number
CEND_Startdate: M/D/YYYY or MM/DD/YYYY is acceptable.
Care_Program: Name of care program within your organization the consumer is affliated with (if any)
Care_Program_StartDt: M/D/YYYY or MM/DD/YYYY is acceptable.
Care_Program_EndDt: M/D/YYYY or MM/DD/YYYY is acceptable.
Care_Manager: Patient’s Care Manager within your organization.
Care_Manager_Phone: Patient’s care manager’s phone number contact.
Care_Manager_Email: Patient’s care manager’s email contact. Ex: abc@ainq.direct.org
RiskScore1
RiskMethodology1
RiskScore2
RiskMethodology2
Region: CRISP Region is associated with your organization (AK).
DirectEmail: Patient’s email address. Ex: abc@ainq.direct.org
DocHaloID
Follow_Up_Date
Appointment_Missed_Date
Values required for delta panels only
Member_Status: Action necessary for patient’s account on your roster. Acceptable values:
ADD, UPDATE, DELETE
Provide these values if available
Address_2: The following values are acceptable: Unit / APT / #202
Social Security Number (SSN): Acceptable formats: 999-99-9999; 999999999. If the full social security number is not available, please leave the cell blank. Last 4 not permitted.
Provide these values if available
Care_Alert
Assigning_Authority_Code
Guides & Resources
Panel Processor Upload Tips (PDF)
Provides a printable version of the guidance on this page, allowing users to review panel upload requirements and troubleshooting tips offline or keep them as a quick reference.
Patient Panel Template - Clean Formatting
Provides a ready-to-use patient panel template with columns arranged and labeled exactly as required for submission, with instructional formatting removed to support successful uploads.
Patient Panel Template - Instructional Version
Provides a color-coded patient panel template with embedded instructions and examples to help users understand required fields and formatting. This version is intended as a reference only and should not be uploaded directly, as the added formatting and instructional content will cause upload errors.
Panel Processor User Guide (PDF)
Provides step-by-step instructions, screenshots, and detailed guidance for accessing the Panel Processor, preparing files, uploading panels, reviewing upload history, and resolving common validation issue (provided by our technology partner, CRISP).
Panel Processor Training Video
Provides a recorded 37-minute walkthrough, created by our technology partner, CRISP Shared Services, demonstrating how to use the Panel Processor application within the HIE Portal. The video covers selecting a panel, uploading patient panel files, reviewing processing results, and navigating common steps involved in maintaining and updating patient panels.
Getting Help
Not sure who to contact? Reach out to the healthEconnect team:
- 907-770-2626
- info@healthEconnectAK.org
- www.healthEconnectAK.org
Resource Page: Patient Panels
The onboarding pathway provides a structured introduction to the HIE, but all resource materials are also available individually through our Resource Library. Browse guides, videos, FAQs, and training materials at any time to support your ongoing learning and day-to-day use of the HIE.